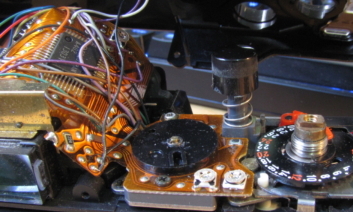
Minolta X-9 Top Plate Removal and Reassembly

I posted these instructions over on Photrio, but thought I’d post them here as well.

In my last post, I replaced a dud capacitor on a Minolta X-9 that I was given by a friend. The Minolta X-9, otherwise known as the X-300s I believe, is similar to the X-300 and other X-series cameras, but not exactly the same. I couldn’t find specific instructions for working on this camera anywhere. Removing the bottom plate to fix the capacitor is easy, and the X-300 repair manual suffices for many other things, but the top plate is slightly different to the other X-series cameras, so I thought I’d figure out the way to remove it and put it here so others can use it. I mean, it’s really only points 1 and 2 that are different, but sometimes it helps to know things specifically. And I’m starting to think this camera is a bit underrated, once you come to terms with all the plastic.

Sorry for all the dirt in the photos, by the way.

Unless otherwise specified, all screws need a size J000 JIS screwdriver. All screws unscrew anticlockwise like normal.

Removal

1. Remove the finger plate around the shutter button. Prize this up from the front, gently, with a thin plastic tool. You can run this around the edges, but you get more purchase near the shutter button on both sides as there’s a locator pin further down. Just don’t apply too much pressure to the bit that goes around the shutter button because it’s thin.

Minolta X-9 / X-300s top plate removal

Minolta X-9 / X-300s top plate removal

2. There are two screws below the finger plate, marked in yellow. Undo these and you can remove the cover over the shutter speed selection dial and film advance lever screw. (The red arrow is the hole the locator pin goes into.)

Minolta X-9 / X-300s top plate removal

3. Remove the film advance lever screw (red arrow). This needs a size J1 screwdriver.

Minolta X-9 / X-300s top plate removal

4. When you take off the film advance lever, take care about the spring beneath it. This is tricky to get back in – it needs about a 270 degree anticlockwise rotation from its resting state to line up correctly, and you’ll probably need three hands. One end goes into the hole on the edge of the advance lever, the other goes into the hole marked in the second photo.

Minolta X-9 / X-300s top plate removal

Minolta X-9 / X-300s top plate removal

5. Undo the nut around the film advance axle with a spanner wrench.

Minolta X-9 / X-300s top plate removal

6. Take off the obvious top plate screws: two on either side of the viewfinder, one on the left end, and two on the name plate on the front.

Minolta X-9 / X-300s top plate removal

Minolta X-9 / X-300s top plate removal

Minolta X-9 / X-300s top plate removal

7. Take note of the position of your ISO selector and power switch. Undo the screw on the rewind knob. This needs a size J0 screwdriver, and you’ll need to brace the other end of the rewind axle with a cloth-covered screwdriver or similar. Lift off the rewind knob.

Minolta X-9 / X-300s top plate removal

8. Undo the plastic disk with a spanner wrench. This holds the ISO selector wheel in place. There is a circular wave spring below it. Lift off the ISO selector wheel

Minolta X-9 / X-300s top plate removal

Minolta X-9 / X-300s top plate removal

9. You can now take off the top plate. Don’t be too eager, because there are three wires leading to the hot shoe that are soldered on. Desolder them if you need to remove the top plate completely.

Minolta X-9 / X-300s top plate removal

So that’s the top plate removed.

Reassembly

A few pointers on lining things up when reassembling:

– The shutter button has a central pole that goes into a light grey tube near the shutter speed dial. The spring goes on first. There are three tabs around the edge of the button that prevent it from fitting through the top plate, so make sure you put this back before the top plate goes on.

Minolta X-9 / X-300s top plate removal

Minolta X-9 / X-300s top plate removal

– The viewfinder surround is only held in by the top plate screws on either side of it. There are two channels around its edge – the outermost is for attaching an eyecup or some such, and the innermost sits into the top plate. When sitting correctly in the top plate, the tabs with the screw holes fit between the top plate and the camera body. You might need some extra arms to keep this in place while also lining up the shutter button and power switch when you’re putting the top plate back on.

Minolta X-9 / X-300s top plate removal

Minolta X-9 / X-300s top plate removal

– The power switch actuator is the white lever near the rewind pole. The power switch interfaces with the U-shaped indentation at the end of the lever. (The ISO interface pole is behind the axle – just ignore that arrow.)

Minolta X-9 / X-300s top plate removal

– When the top plate is back on, but before you replace the ISO selector wheel, you can tell if the power switch is interfacing properly by viewing the switch through a hole in the top plate.

Switch set to Off: all white (lever is directly below the hole)

Minolta X-9 / X-300s top plate removal

Switch set to On: half white half empty (looking at the edge of the lever through the hole)

Minolta X-9 / X-300s top plate removal

– The ISO selector wheel has a hole on its underside that interfaces with the grey pole you can see at the far left of the two pictures above.

Minolta XE-5 Film Advance Repair

A couple of months ago, just before the birth of my son, I fixed the film advance on my Minolta XE-5. The lever had not been completing its action properly, and when it got to the end of its rotation there would still be some film winding left to do, so it would just return loosely. It had to be pushed to the end of its travel again before the action would complete, the lever would return under spring action, and the shutter would be unlocked.

The XE-5’s plastic prism cover, though potentially more fragile than metal and (in my opinion) a slightly questionable aesthetic design choice, has the benefit of separating the top plate into three sections: the prism cover, and left and right covers made of metal. This simplifies some repairs, because if you only have to make a repair on one side, you don’t have to disassemble the other.

Minolta XE-5 winder return fix

Minolta XE-5 winder return fix

There’s not too much complicated about the top plate removal beyond making note of where things were aligned. I had the shutter speed dial set to Auto just as a reference (and to keep the dial from being moved), and I left the power selector set to On so that the shutter could be released while disassembled (for testing the winding function). Also important to align correctly is the strangely shaped part below the brass spring in the photo below, which interfaces between the film advance lever and its axle. The easy way to remember its alignment is tho make sure the larger, stronger tongue is on the left, as this is the part that transmits the lever’s force in an anticlockwise rotation.

Minolta XE-5 winder return fix

Once the top right cover is removed, you can just access the rachet that governs disengagement of the film advance lever, which needs to be cleaned to remove the gunk causing the issue. The ratchet is connected to the small brass pin that is between the two arms of a spring – in the photo below, this is below the PCB (gotta love those 1970s electronics!) and just to the right of the silver screw near the strap lug. You can tell that this is gunked up by moving the pin – it may be stiff.

Minolta XE-5 winder return fix

I cleaned the ratchet’s pivot and the end of the ratchet itself (where it engages the toothed plate connected to the film advance axle) with some isopropyl alcohol on the end of a toothpick that I’d whittled to a point, just dabbing on a small drop and waiting for it to dissolve the gunk and evaporate. I then applied a small amount of light synthetic oil to both areas. I could immediately feel that the ratchet moved more smoothly and quickly. I put the strangely shaped part and the advance lever back on top of the film advance axle temporarily and went through the fire-wind sequence a few times to check the repair was effective – the advance lever returned at the end of each stroke as it should, with no extra push necessary.

This camera has the smoothest film advance mechanism I have ever felt. It takes even less effort than a Voigtländer Vito C-series film advance, despite having a much more complicated shutter to charge. In fact, now that it’s fixed, it feels more broken – it is so smooth that it’s difficult to believe it’s working. I am a little bit in awe.