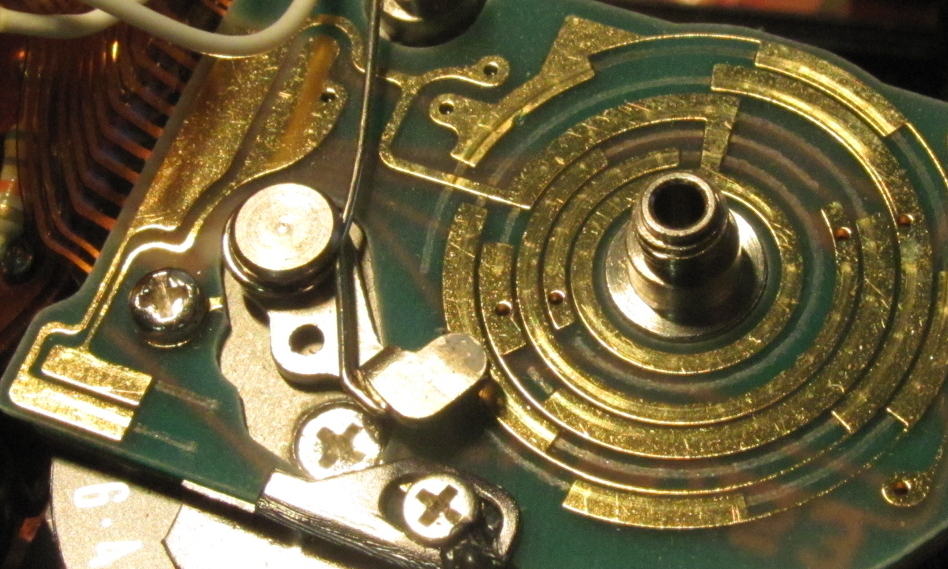
Canon A-1 Mode Switch Repair

My Canon A-1 (which I fixed the wheeze on here but please don’t use that method because it’s a bad hack that could cause more harm than good) was doing something weird. Every so often, when taking a photo indoors in aperture priority mode (Av), I would notice that the camera’s settings would jump to a really long exposure time like 30 seconds. Sometimes the only notice I’d get of this would be the camera actually taking a 30 second exposure instead of the more normal 1/60th at f/1.4 that I was hoping for.

The A-1 uses a single dial to select aperture settings in Av mode and shutter settings in Tv mode. The mode switch changes which part of the dial is displayed – the outer ring for shutter speeds, and the inner ring for apertures. At some point, I realised that the erroneous shutter speeds I was getting in Av mode were the shutter speeds at the same dial position in Tv mode. This was most noticeable when it was at the f/1.4 and 30 second position, but way less obvious when it was at the f/4 and 1/2 second position, because the difference between the expected and actual shutter speeds was smaller. I think this has been the cause of a few blurry photos. So I opened the camera to investigate.

The mode switch rotates around the shutter button, but it moves a sliding plate that has a crescent-shaped part that hides the unnecessary side of the dial, with a line half way along it to indicate the current setting. On the underside of one corner, this plate has a pair of brushes which bridge two contacts on the circuit board below when in Av mode and leave them open when in Tv mode. This plate is mounted on another plate which is only really fixed along the front side of the camera, the side opposite the brushes. This means that the contact of the brushes is slightly susceptible to flex due to finger pressure on the top of the camera, such as when finding and using the shutter button by touch, switching modes, or moving the dial.

Canon A-1 mode switch repair
Location of contacts, brushes, and crescent indicator on the sliding plate moved by the mode switch
Canon A-1 mode switch repair
Brushes from the underside. Note the two screw holes on the opposide side of the plate to the brushes.
Canon A-1 mode switch repair
The contacts bridged by the brushes. Note the tracks worn on the PCB from when the brushes slide back off the contacts when entering Tv mode.

I took the plate off and cleaned the circuit board contacts with some isopropyl alcohol. I also bent the brushes on the underside of the plate slightly downwards for a little extra spring pressure on the contacts, to hopefully reduce the effect of flex. Then I put it all back together. (Aside: my camera is missing a few washers from the shutter button and winder mechanisms, as well as the detent ball for the setting dial guard —  I think someone has been in here before me.)

So far, so good. I haven’t noticed the shutter speed bouncing around, and the test roll photos turned out fine.

Canon A-1 test
Canon A-1 test photo on Kodak UltraMax 400
Canon A-1 test
Canon A-1 test photo on Kodak UltraMax 400
Canon A-1 test
Canon A-1 test photo on Kodak UltraMax 400

Voigtlander Vito CLR – Parts Bin Restoration Part 1

Judging by the bulk of my recent camera acquisitions, I have a thing for trying to restore and recover the unloved. This started a while ago, I believe, with my Dad’s old Voigtländer Vito CD. It is clearly broken, and its shutter is gummed up to the point it doesn’t open willingly. I have a theory (one I’m unable to confirm, though production dates for these cameras support it) that Dad dropped the Vito CD and tried unsuccessfully to repair it; he then replaced it with a Vitoret R but wasn’t happy with its lack of a light meter, and so bought the Canon FT QL that is now the heart and soul of my photographic adventures. About 8 years ago I managed to work the Vito CD’s shutter free, but not permanently. I also bought a Zenit E with a broken shutter about that time, which is still in a hundred pieces in a box, so it hasn’t been all smooth sailing for the cameras I try to restore. But the Vito CD has stuck in my mind as something I have to finish one day.

With that in mind, I bought a Voigtländer Vito CLR from a parts bin at a camera fair. I asked what was wrong with it and the seller didn’t give a definite answer. The shutter speed ring was quite stiff, and the light meter window was loose, but the rangefinder appeared functional and the body was in fairly good condition. For $10 it would make a good parts camera, or a bargain of a baby rangefinder if I could get it working. As the top model of the Vito range, it has both a lightmeter like the Vito CD and a rangefinder like Dad’s old Vitoret R; it also has the Color-Skopar 50mm f/2.8 lens that is reputed to be a fair bit better than the Color-Lanthar lenses of the other two. It wasn’t a hard decision to buy it. And when it became evident that most of my other repair projects require (de)soldering work, I decided to take on the shutter speed ring repair, suspecting that there might be some misaligned or broken parts inside.

Voigtländer Vito CLR shutter

It’s relatively easy to get to the shutter mechanism of Vito C series cameras. At least, thus sayeth the internet. All possible sources I found, including the Voigtländer repair document from Mike Butkus and another I obtained on a forum, say the first step is to remove the three retaining screws on the focus ring. But I couldn’t find these three screws for days. I began to suspect, despite the silence of the repair documents on this step, that the focus ring’s distance gauge would have to be removed. I also suspected (based on a failed approach to the Vito CD’s shutter issues) that the distance gauge would be springy and send screws flying if I wasn’t careful, but it was relatively well behaved, and sure enough the three retaining screws were underneath.

Voigtländer Vito CLR shutter

Dear future self: do yourself a favour, and mark your lens elements properly before removing them. I don’t quite remember whether I didn’t mark the front element at all, or just marked it with lead pencil. Either way, by the time I was putting the front element back on the lens, I was flying blind. Set the lens to infinity before removing the distance gauge, don’t twist the focus ring when you’re taking it off, and mark both the casing of the lens element and a reference point below it so that you’ve got something to work with. Also, find the point at which the element comes free when unscrewing it, and make a mark (probably a slightly different mark to the first) on the casing in line with your reference point so that you know approximately where to find that point again. Save yourself a headache.

Anyhow, below the front lens element is the middle element, and this needs to be removed using a spanning wrench. The holes for the wrench are hard up against the inside edge of the screw thread for the front element, so the bulky tips of my regular lens wrench wouldn’t fit. My first attempted workaround was to use a pair of drafting compasses. I had bought two pair at a newsagency, the cheap kind you used to draw lines with at school, and swapped the arms so that one pair had two pointy ends. This didn’t work so well. It spanned just fine, but it didn’t wrench – it bent, and one of the points fell down onto the middle lens element. A fine lesson in the relationship between the quality of your tools and the likelihood of success. So instead I took a lateral approach to using the straight-tipped spanning wrench I had initially rejected, removing the end of one arm from the cross-piece so that the arm could be held at an angle to the other arm. Taking care to hold the wrench arms securely in place, this worked perfectly.

Voigtländer Vito CLR shutter

From this point on, disassembly generally followed the repair manual’s guidance. Once I’d removed the shutter’s front plate, I found that everything was basically in order – no obviously broken parts and everything seemed relatively clean. On further inspection, I found that the shutter speed ring was only stiff when it was linked to the brass ring around the outside of the helicoid in the photo below. This brass ring also has a link to the aperture ring, so I assume it is the actuator for the light meter match needle, as the match needle moves when you move either of the shutter speed ring or the aperture ring. I cleaned up this helicoid using isopropyl alcohol on cotton buds (not really sufficient, I know, but the best I could manage without a full tear-down and I wasn’t feeling confident enough to attempt that) and re-lubricated it with Helimax-XP. This allowed the shutter speed ring, when linked to the brass ring, to move freely enough that it could be adjusted with one hand – a satisfying improvement. While I was in there, I also dabbed some microdots of camera oil on the gear shafts for the self-timer and the shutter mechanism. The self-timer actually runs through its full operation now, which is some kind of miracle.

Voigtländer Vito CLR shutter

It was while putting everything back together that I realised the stupidity of using lead pencil to mark lens element alignments. Despite getting it all back together in a fairly convincing-looking way by tracing back my steps (with some fascinating side journeys, like observing how the actuator pin for the rangefinder works), I couldn’t be sure that the focus was accurate. I had read on the interwebs about using a ground glass across the film plane to test focus, and of using frosted scotch tape if you don’t have a spare ground glass. I also read about using a piece of CD case with tape stuck to it, as it’s more rigid and not prone to sagging. This is a great idea, but CD cases aren’t trivial to cut neatly, so I cut a piece of overhead transparency to the width of 35mm film and used that instead. It sits easily on the film rails and is quite rigid enough to avoid problems.

Voigtländer Vito CLR shutter

As I found when fixing the Tokina lens, it’s hard to find somewhere to focus to infinity when you live on the bottom floor of an apartment block. I headed out to the street and ended up propping the camera on the dashboard of my car to get a decent view of a mess of powerlines about 50 metres away. I set the shutter to B and held it open with one hand, and turned the front lens element using the other, then used a magnifying glass to view the image displayed on the pseudo-glass. When I had achieved as much resolution as possible between the power lines (which are quite small targets – the clarity of an image on frosted scotch tape is adequate but not stellar) I marked the casing of the lens element and a reference point with some fine scratches, then headed back inside to reattach the focus ring. With everything reassembled, the only thing left was to test it. The test film images below (shot on Lomography 400 colour film) show that focus is accurate. Lucky save! But also a pretty effective method.

Voigtlander Vito CLR test film

Voigtlander Vito CLR test film

Voigtlander Vito CLR test film

I quite enjoyed shooting this test roll. The Voigtländer Vito CLR feels quite familiar after shooting a Vito CD and a Vitoret R, but the combination of rangefinder and light meter in one package makes for a more complete camera. Looking at the test images, I’m also impressed by the clarity of the Color-Skopar lens when compared to the Color-Lanthars of the other two cameras, which can be softer if still quite pleasant (images from both can be found a fair way back on my Flickr photostream). The Vito CLR is, somehow, a more serious camera tucked into the same round, unassuming (even with all the chrome), silent-as-a-mouse little Vito C-series body. Ten dollars and a few hours’ work is a small price to pay to give a good camera a second chance at life.