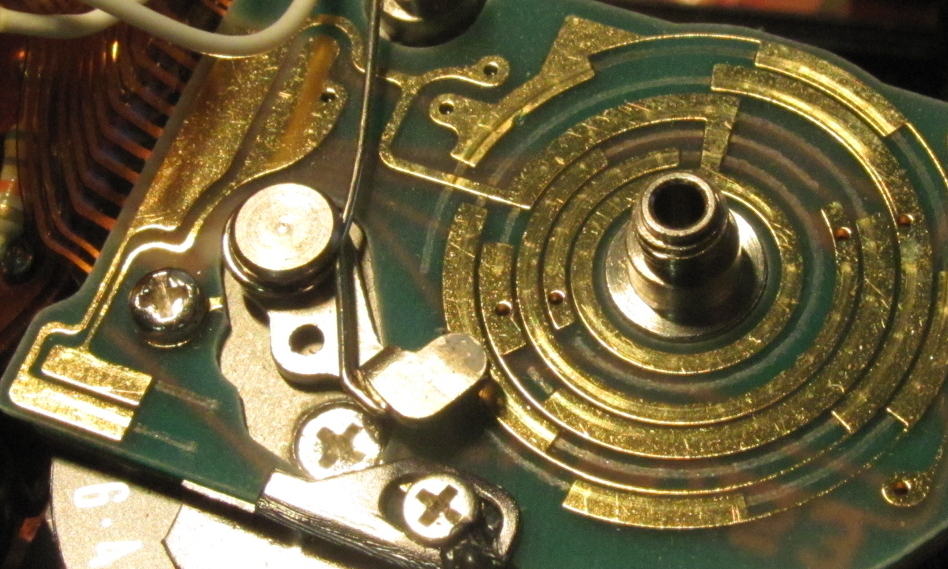
Canon A-1 Mode Switch Repair

My Canon A-1 (which I fixed the wheeze on here but please don’t use that method because it’s a bad hack that could cause more harm than good) was doing something weird. Every so often, when taking a photo indoors in aperture priority mode (Av), I would notice that the camera’s settings would jump to a really long exposure time like 30 seconds. Sometimes the only notice I’d get of this would be the camera actually taking a 30 second exposure instead of the more normal 1/60th at f/1.4 that I was hoping for.

The A-1 uses a single dial to select aperture settings in Av mode and shutter settings in Tv mode. The mode switch changes which part of the dial is displayed – the outer ring for shutter speeds, and the inner ring for apertures. At some point, I realised that the erroneous shutter speeds I was getting in Av mode were the shutter speeds at the same dial position in Tv mode. This was most noticeable when it was at the f/1.4 and 30 second position, but way less obvious when it was at the f/4 and 1/2 second position, because the difference between the expected and actual shutter speeds was smaller. I think this has been the cause of a few blurry photos. So I opened the camera to investigate.

The mode switch rotates around the shutter button, but it moves a sliding plate that has a crescent-shaped part that hides the unnecessary side of the dial, with a line half way along it to indicate the current setting. On the underside of one corner, this plate has a pair of brushes which bridge two contacts on the circuit board below when in Av mode and leave them open when in Tv mode. This plate is mounted on another plate which is only really fixed along the front side of the camera, the side opposite the brushes. This means that the contact of the brushes is slightly susceptible to flex due to finger pressure on the top of the camera, such as when finding and using the shutter button by touch, switching modes, or moving the dial.

Canon A-1 mode switch repair
Location of contacts, brushes, and crescent indicator on the sliding plate moved by the mode switch
Canon A-1 mode switch repair
Brushes from the underside. Note the two screw holes on the opposide side of the plate to the brushes.
Canon A-1 mode switch repair
The contacts bridged by the brushes. Note the tracks worn on the PCB from when the brushes slide back off the contacts when entering Tv mode.

I took the plate off and cleaned the circuit board contacts with some isopropyl alcohol. I also bent the brushes on the underside of the plate slightly downwards for a little extra spring pressure on the contacts, to hopefully reduce the effect of flex. Then I put it all back together. (Aside: my camera is missing a few washers from the shutter button and winder mechanisms, as well as the detent ball for the setting dial guard —  I think someone has been in here before me.)

So far, so good. I haven’t noticed the shutter speed bouncing around, and the test roll photos turned out fine.

Canon A-1 test
Canon A-1 test photo on Kodak UltraMax 400
Canon A-1 test
Canon A-1 test photo on Kodak UltraMax 400
Canon A-1 test
Canon A-1 test photo on Kodak UltraMax 400

Canon A-1 wheeze fix

There’s a well-known issue with Canon A series cameras where the mirror damper mechanism’s lubrication dries out and the mechanism becomes slow and noisy. The noise sounds to me like a wheeze, but other people call it a squawk or a squeal or a screech. The human ability to be flexible with onomatopoeic terminology is still an advantage that we have over the computers that will one day rule us, but it does make it a little bit more challenging to google.

I bought an A-1 recently, and apart from the wheeze it was in pretty good condition. I decided to fix the wheeze. There are quite a lot of methods going around the internet, but they fall into one of two categories based on how you re-lubricate the mirror damper:

– Through the bottom of the camera

– Through one of the lens mount screw holes

There’s also a lot of really bad advice out there about spraying WD-40 in towards the mechanism. This is like using a shotgun to nail a picture to the wall. It’s not the right kind of tool, in the first place; even though a shotgun and a hammer/nail combo would both end up putting a hole of some kind in the wall, the shotgun will make the wrong kind of hole. WD-40 is only partly a lubricant; when sprayed, it goes everywhere and gets sticky over time. See my previous posts for what I think about sticky substances around cameras. For this fix, you need a tiny drop of the right kind of lubricant in a very precise location. Other fixes online suggested dropping oil into the camera body from the bottom of the camera, and that’s bad because it’s not precise, and there are things (i.e. the focusing screen) that you really don’t want to get oil on.

The most precise fixes involved using a long needle to place a tiny drop of oil on the mirror damper mechanism. Using a long, straight needle from the bottom of the camera seems to be a fairly common way to do this; however, this seemed to require a fairly precise guess about where the end of the needle was. If you go in via the top-left (looking at the front of the camera) lens mount screw with a curved needle, as described in this video, you can get a bit more feedback.

Canon A-1 Wheeze Fix

I used a 25-gauge needle that I curved a little more than the needle in the video. With this curvature, I could find the axle that needed lubrication and feel that the end of the needle was in the right place by moving it back and forth across the curved top of the axle. With the needle on top of the axle, I could also move it side to side to make sure that the needle point was close to the gear. I practiced this a few times before applying the oil. I also practiced making a tiny bead of oil on the end of the needle so I knew how much pressure to apply to the syringe – really not much at all!

Canon A-1 Wheeze Fix

The first few shutter releases sounded about the same. I waited about a minute, tried again, and the noise was getting softer but was still there. After about 5 minutes, the noise was gone, and has stayed gone.

I would very much recommend the method of re-lubricating the mirror damper mechanism through the screw hole. A blunt-end syringe needle of the kind I used here can be gently curved with some careful pressure from round-nosed pliers, giving a tool that provides enough feedback to be sure of your accuracy.